How to Get Started With Networked Thinking and Logseq
Logseq does things differently. Free your thoughts using Logseq's flexible outline format and connect your notes to spark creativity.

This article is loosely based on the Logseq onboarding event below. If you find anything confusing or have ideas on how to improve this article, please share your thoughts with us.
How do you take notes? If you're like most people, you'll either use pen and paper or some generic note-taking app. But if you're a busy professional with little time to think, a networked note-taking tool might be better for you.
Instead of saving single notes in a single folder, any note-taking app that lets you link to other notes will make a big difference. In recent years, the so-called networked note-taking paradigm has gotten a boost. In this article we'll look at the importance of writing notes in an interlinked network.
What is networked thinking?
Most note-taking tools try to emulate pen and paper. You have notes that you can save in folders, but that's about it. Some new note-taking tools are doing things differently and depend on creating a network of links.
In a networked note-taking tool like Logseq, it doesn't matter where you've stored a note; from any part of your notes collection you can easily link to any other part. While the data lives somewhere, it doesn't matter much where.
In a networked note-taking tool it's not just the notes themselves that provide value; just as important are the relationships between different notes. Think of a detective that has a wall with photos and notes connected by yarn to understand relationships. Each piece on the wall is part of a puzzle, but the relationships between those pieces of information are just as crucial.
When the value you get from your notes depends as much on the connections between notes as the notes themselves, you're ready to use a networked thinking tool like Logseq.
Why does networked thinking matter?
The whole reason we use note-taking tools is because our own brain is limited. Our long-term memory can be spotty, and we can only juggle about a handful of items in our working memory at any given time. Note-taking tools expand both of those memory stores.
Unfortunately, few note-taking tools work like our brains do. Most tools try to emulate physical pages and folders in the digital realm. But our minds are like a web, where one thought can trigger another one. If we truly want to become effective with our digital tools, they should function in a way that's most natural to us.
The need for good thinking tools is only becoming more important. As we get more connected, our world is rapidly becoming more complex. We're bombarded by more information than ever, and it's difficult to filter out the noise. Solutions to our complex problems exist—if we know where to look.
Knowing where to look for solutions is a discovery process. We must be able to easily capture information and then slowly digest it. When we use networked thinking tools, we can easily capture, connect, and retrieve related pieces of information.
Introducing Logseq: a networked outliner
If you've ever written a list, you've written an outline. While the basic structure of an outline isn't very complicated, it does not come naturally to everyone. Some people just like to write one paragraph after another.
When you write in an outline, you don't just write from left to right and top to bottom. There is a third dimension: indentation. By nesting some bullets below others, you can create several hierarchies within pages. This is also called a tree-like structure, where individual bullets are like the leaves and collections of indented bullets are called branches.
Logseq adds another hierarchy to outlines, as it's a tool that's built on top of a graph database. That means that connections between text don't just exist on indentation level, but that any piece of information can connect with any other piece—regardless on what page that information lives.
Before we dive into all the cool and useful things that Logseq makes possible, let's first have a look at the fundamental parts of an outliner. And you'll see, just doing knowledge work using an outliner can help you to reduce information overwhelm and enable you to be more creative.
The fundamental parts of an outliner
While strictly spoken only the first two fundamentals are core features of a true outliner, the other fundamentals are logical consequences of the first two.
Logseq is unapologetically an outliner and makes full use of the outline format. Even if you prefer to write in long-form, working with an outliner for some use cases can boost your productivity by a lot.
Fundamental 1: Indentation
As said earlier, outlines are basically lists. But what makes an outline unique is that is allows for indentation. That means that not all items on the list have to be on the same level; there can also be subitems, or items that are nested underneath other items. Or in simpler terms: lists within lists.
A nested item is nothing more than a bullet that's moved one Tab to the right compared to the bullet that precedes it.
In outliner-speak this relationship between an item and a subitem is called a parent-child relationship. The item that's on top is the parent whereas the nested item is called the child. Items that are on the same level of indentation are called siblings, but they're less important in this explanation (or in Logseq).
Here's a visual representation of parent-child relationships:
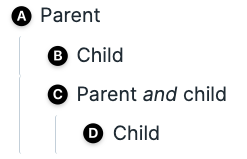
Let's walk through the example step-by-step:
- Block A is a parent block; B and C are children of A; block D is a grandchild of A.
- Block B is a child of A and it's in the same branch as blocks C and D.
- Block C is a child of A and the parent of D.
Fundamental 2: Expand and collapse
When we talk about expanding an outline, it means that a (or all) parent items show their children. When we talk about collapsing the outline, it means that all children are hidden under the parent(s) and only the parent items show.
As always, it's best to show it using a visual:

Expand and collapse are crucial features of any outliner tool. If you can't hide items or branches of items, you'll soon face information overwhelm. But by collapsing an entire outline, you zoom out to a 10,000-feet overview. Expanding a single branch, you drill down to a much richer view.
Fundamental 3: Focus/zoom
Collapsing parts of an outline helps to reduce information overwhelm, but the first level items (the parents) will always show. To further reduce noise, outliner tools like Logseq have introduced a zoom functionality.
In most modern outliners, clicking on a bullet zooms you in on that item and all of its subitems (children). What that effectively means is that you hide all of the siblings of the item you've just clicked on.
In regular note-taking tools, you'd create different notes to filter out the notes, scattering your thoughts throughout the tool. But in an outliner tool that has zoom, you can simply create single pages for projects, dump all related information on it, and then zoom in on the part you want to work on.
When you spend less time figuring out where information goes, you'll have more time and mental space to think about the information itself.

Fundamental 4: Sidebar
When the outliner tool Roam Research gained traction in early 2020, one of the features that upended many people's workflows was the sidebar. It marked the end of having to juggle separate screens, which only added cognitive load.
When you can open any item or branch of items by zooming in on them, why not provide an additional area where you can look at these zoomed-in snippets of information? That's exactly what the sidebar does in tools like Roam and Logseq.
Having a sidebar means you can easily open different snippets of information regardless of where they are in your collection of notes. There's no more need to open the notes tool several times so you can have side-by-side windows. It's also no longer necessary to place related information on the same page. All you need to do is open the information you want to see in another context in the sidebar, and then open the information you want to compare or contrast it to in the main window.
Fundamental 5: Quick entry
With the ease of organizing information using indentation and seeing it in new contexts using the sidebar, it doesn't matter much where information exists in an outliner. That makes quick entry much easier.
Files and folders are less important in an outliner as you can quickly group related notes under a parent item. And reordering items is also a breeze by simply opening them in the sidebar and dragging them around.
Outliner tools that have fundamentals one through four, often provide functionality to make adding new notes a breeze. Many outliner tools have adopted the concept of a daily or journal note; a page that has a date as title and where you dump all of your notes of that day.
Using a daily notes page/journal takes away important friction in note-taking: answering the question "where does this information belong?" Instead of giving notes a specific place in your notes collection, you give them a place in time. Later in this guide, we'll see how you can still easily feed notes from this date-stamped page to specific pages.
Now that we have the fundamentals of outliner tools out of the way, let's have a closer look at how Logseq does things.
The fundamentals of Logseq
The core and most important fundamental of Logseq is that it's a local outliner. Let's unpack that:
Logseq is local in the sense that all data is saved on your machine and that no data is sent to servers on the internet. If you're privacy conscious and want ownership over your own data, Logseq is the tool for you.
Logseq is an outliner in the sense that every piece of information has a little bullet in front of it. In Logseq-speak this is called a block, and it's the smallest unit of information in Logseq. Pages are nothing more than collections of blocks. If you're familiar with Roam Research, you'll immediately grok how blocks work in Logseq.
Now that we have those crucial concepts out of the way, let's look at some of Logseq's core features. While these features only represent about 20% of Logseq's total arsenal of tools, they'll help you get 80% of your work done.
Journals
Many newcomers to Logseq are confused as to where to store their information. "When should I create a new page and when should I just use the Journals page?" is a common question. The answer is simple: 99% of your information should first be entered on the Journals page.
What is this Journals page? It's a note with today's title, meaning that it gets refreshed every day. But no worries: everything you've entered on the Journals page in the past is saved in pages with their respective dates. This is log in the name Logseq.
By using Logseq as a logbook first and foremost, you greatly reduce cognitive load. Whereas in many other note-taking tools you first need to decide where to store a note before entering it, Logseq makes it easy to offload your thinking. By taking away the decision of where to store information, the thinking can come to the forefront.
Now, you may worry that saving everything on a date-stamped page makes your notes very messy over time. Luckily this doesn't have to be the case—if you know how to handle blocks.
Blocks
Everything in Logseq is a block. You can recognize blocks by the bullet that's in front of it. And because Logseq is an outliner, blocks can be organized in a variety of ways.
If you store all of your information on the Journals page, knowing how blocks work is crucial. After all, we're trying to reduce information overload while linking our notes.
The easiest way to link blocks is by using indentation. As we've seen in the section on the fundamental parts of outliners, the most basic information structure in an outline is the parent-child relationship. By indenting blocks, you can easily store lots of information on a single page. Using the collapse and expand functionality, you can easily hide and show information.
Whereas in most other note-taking tools the smallest unit of information is a page, in Logseq that role is fulfilled by the block. While you can create pages in Logseq, they're essentially collections of blocks and branches of blocks. You can basically think of the page name as the parent block and all blocks on that page being the child blocks.
Therefore, you shouldn't worry too much about pages. It's much easier to create branches of blocks on the Journals page than to think of a page name, switch to that page, and write there.
Now we have the basics of easy information entry in Logseq. But as your graph starts to fill up with notes, how will you ever find back older notes? Do you really have to scroll back in time to find them? Luckily not, as another core feature of Logseq is its links.
Links
Links are what make Logseq a networked thinking tool. While it's easy to create connections between blocks using indentation, you'll probably want to link to other notes as well.
Linking in Logseq is a bit special in that every link actually consists of two links: one link to the destination and one link from the destination back to the original link. This is called bi-directional linking and it's what makes finding notes in your graph a breeze. If you want to know more about bi-directional linking and its history, I highly recommend reading this visual guide by Maggie Appleton.
In Logseq there are three ways to create links, from least to most specific:
- Page links, which point to collections of blocks.
- Embeds, which show a block and all of its children.
- Block references, which show a single block.
We'll now look at each type of link and how to use them.
Page links
The easiest way to create and link to pages is by using so-called wikilinks. You create a wikilink by putting a word or several words between [[double square brackets]]. This type of linking is used in many note-taking tools and is the de facto standard of linking.
Another way to link to a page is by putting a #hashtag before a word. Tags and wikilinks have the same function in Logseq. The difference between the two is mostly cosmetic, and hashtags have the limitation that they cannot contain spaces.
When you link to a page that doesn't exist yet, Logseq will create that page for you. So no need to use the search bar to create a page; just create a link. When you then click on that link, you're taken to the page and will see where you came from in the section Linked References at the bottom of the page. This is bi-directional linking in action.
Most Logseq users link to pages liberally. This isn't because they write on those pages, but to link notes together. This is handy when you write about concepts and want to synthesize ideas over time. After writing a bunch of notes on a topic, simply head over to a page and check the linked references section. Many Logseq users treat their linked references as a kind of inbox, and simply drag related blocks onto the page and synthesize the information.
Embeds
Embeds are like portals to other parts of your graph; not only will they show the contents of a block or a branch of blocks, you can even edit them directly through the embed.
There are two types of embeds in Logseq: page embeds and block embeds. As we've discussed already, pages are basically collections of (branches of) blocks. Still, the syntax to create a page embed is different from creating a block embed.
To create a page embed, either type /page embed and hit Enter, or directly type the following shortcode: {{embed [[]]}} To embed a page, write that page's name between the double square brackets and click outside of the block. The entire contents of that page will now show. Page embeds are handy if you want to build dashboards where you combine related pages on a single page.
A more commonly used type of embed is the block embed. Block embeds show a block and all of its children. In other words: block embeds are useful to show a single branch of blocks. To create a block embed, either type /block embed and hit Enter, or directly type the following shortcode: {{embed (())}} Now start typing some keywords of the (parent) block you wish to embed. Logseq will search your entire graph for blocks matching the keywords. Once you find the block you wish to embed, hit Enter and click outside the block to show the block or branch.
Alternatively, you can copy the ID of a block/branch to your clipboard by hitting Right-Click on the bullet before a block and selecting the Copy block embed option. You can also replace the double parentheses with a single block ref (see the section below on block references). Just keep in mind that when using embeds you'll see the entire branch if the block you embed has child blocks.
Block references
If you don't want to show an entire branch but just one block out of a branch, you need to use a block reference. When referencing a block, you'll see its contents displayed but can't edit it directly as you would with a block embed.
To reference a block, type ((double parentheses)) and enter a search term—just like when you embed a block. Alternatively, you can copy the ID of a block to your clipboard by hitting Right-Click on the bullet before a block and selecting Copy block ref. Paste it anywhere in your graph to show the contents of the block.
Backlinks
Not just pages have a Linked References section; individual blocks also have so-called backlinks. Anytime you embed or reference a block, a little counter on the right side of the block will go up. This represents the number of times that particular block was embedded or referenced elsewhere in the graph. When you click on the counter, the linked references of that block will open in the sidebar, showing all the instances you linked to it.
By traversing your backlinks, you'll start to see patterns in your notes. This is the single most powerful feature that makes graph-based thinking possible.
Tasks
Logseq isn't just a note-taking tool; it's also a powerful task manager. Tasks (called TODOs in Logseq) are a special type of block that can be used in a variety of ways. Not only is it a breeze creating tasks mixed with notes, it's also very easy to fetch all tasks from across your graph.
There are two workflows of task management in Logseq, the first coming from Org-mode and the second being more common in regular task management tools:
- NOW for active tasks and LATER for tasks that are scheduled for the future.
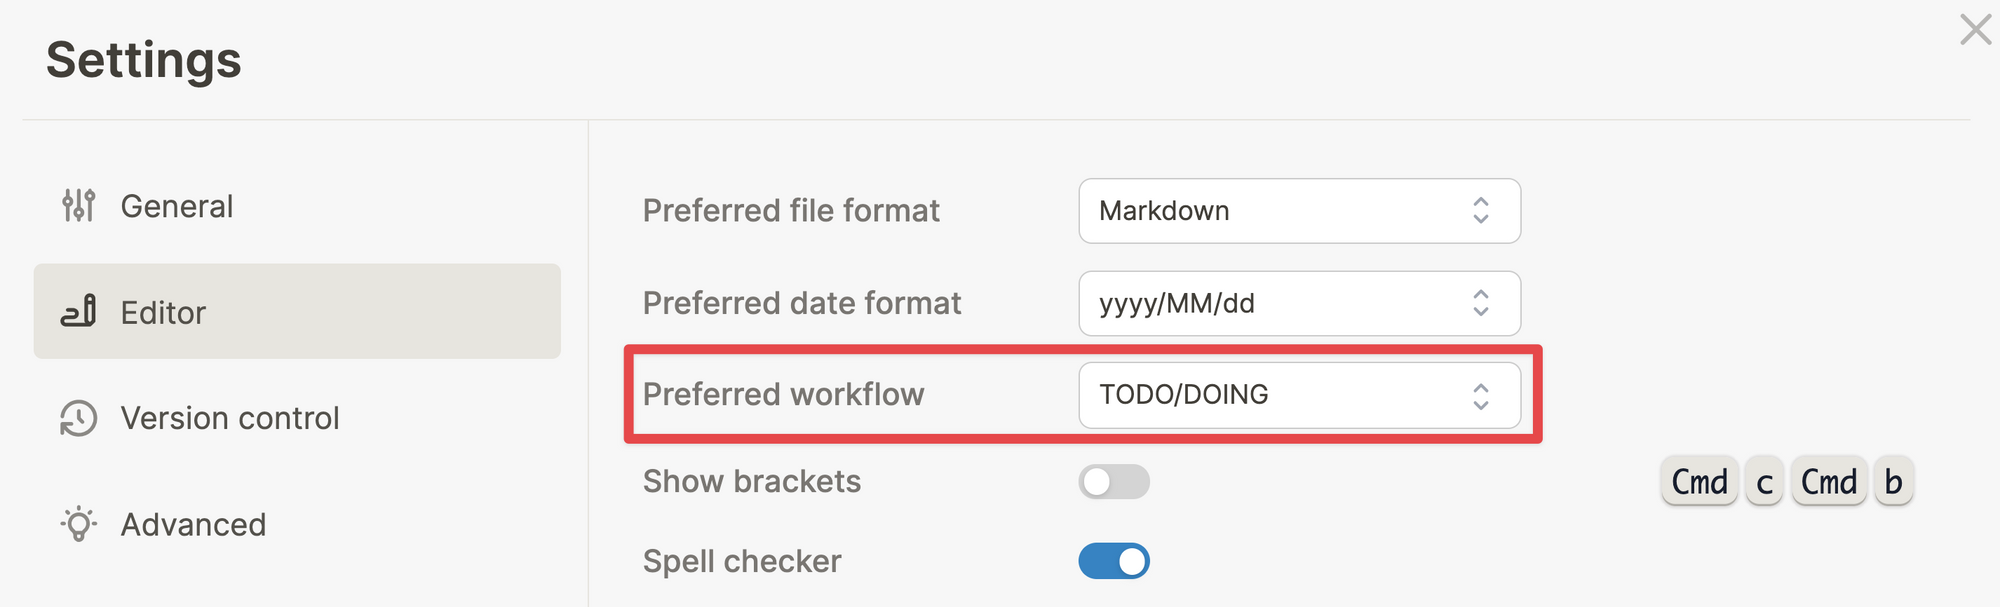
- TODO for inactive tasks and DOING for tasks that are in progress.
You can change your tasks workflow by clicking the three dots (...) in the top menu, selecting Settings, and then navigating to the Editor tab:
The best practice is to keep your tasks as much on the Journals pages as possible, as every task will also be date-stamped that way. This will enable some powerful functionality, as we'll see in the next section.
Once you have settled on a tasks workflow and have been adding tasks to your notes, you probably want to have some way to organize them. This is where queries will come in handy, as they'll enable you to easily resurface blocks from across your graph.
Queries
If you're not into databases, the word query may not be familiar. But just like the literal meaning of the word, a query is nothing more than a question you ask to your graph. In essence, a query is a saved search that updates anytime a block or page meets the question you've asked.
In Logseq, the search terms you put into a query are mostly links. While you can just search on the basis of text, queries are an excellent way to intentionally facilitate workflows. Set up a template with a few links, and you can predictably feed a query anywhere in your graph. Another piece of information you can plug into queries are tasks.
The topic of queries can be daunting to new users, especially ones who are not familiar with databases or programming. But if you've ever used boolean search, it'll make much more sense.
A full explanation of queries is outside the scope of this article as it deserves its own dedicated guide. If you're a new Logseq user I recommend you ignore queries in the beginning and get comfortable with indenting and linking your notes. As your notes graph grows and you feel more comfortable with Logseq, queries will be a topic to focus on next.
If you want to see queries in action, I recommend you watch this portion of the onboarding event (starts at 53:26):
Getting started with Logseq
Now that you know the fundamentals of Logseq, how will you get started?
I recommend you take a simple use case instead of immediately trying to move your entire personal knowledge management system to Logseq. Most Logseq users start out with a simple daily journal to reflect on their days and to quickly collect ideas.
As you become more comfortable using Logseq, you'll think of more use cases. Experiment with different structures, but don't overthink it. In a networked thinking tool like Logseq, structure tends to emerge instead of being imposed.
If you have any ideas on how to improve this guide or know of resources (videos, articles, courses) that help to learn more about Logseq, please send us a message.